1.13.2011

Nancy Drew | Secrets Can Kill (Remastered) | part 1_Combination lock

While on vacation in Florida, a student named Jake Rogers was killed at Paseo del Mar High School. Beech, an undercover detective asked Aunt Eloise if Nancy can go undercover and investigate the murder.

Aunt Eloise's home:
Foyer:    Look close at the note on the table under the mirror.
Read Aunt Eloise's note: the key to the library is in the safe. There's an underlined warning - Remember not to enter in a wrong combination.
Open the right drawer. Read the Sigma Phi Kappa Delta Sorority invitation.
Hallway:    Look close at the tapestry at end of the hallway left of the table.
Safe:    Move the tapestry and see a safe. The lock pad has Greek letters buttons.
Enter the name of the sorority by pressing Sigma Phi Kappa Delta.
Take the library key on the safe door.


Wooden box:    Look close at the wooden box.
Click to open the box and see a slider. Arrange the tiles to form the picture on the cover.

Read the note and learn the school computer's info:
Login name: Eloise Drew
Password: O Wise Elder
Living room:    Enter the room right of the main door.
Side table:    Look close at the end table right of the sofa. Open the drawer.

Read the note pad and learn about Jake and library books out of order. So Jake worked at the library.
Books:    Pan left and look close at books on table under the window.


Book case:
Look close at right side of the book case.
Take one of the red books at right side of the book case. See a secret compartment inside. Take the Teacher's lounge key.
Open the middle cabinet and see a TV and video recorder-player.

Detective Beech:
Click the main door to exit the house and get a call from Detective Beech.
His cover is Uncle Steve. He is at Maxine's Diner wearing glasses and striped shirt. Exit through main door.


Maxine's Diner:
Select Maxine's Diner on the map. Enter the diner.
Daryl Gray:    Talk to the young man behind the counter. Daryl is the student council president at the high school. He mentions the death of Jake.
Detective Beech:    Turn left and forward to the man sitting in a booth.

Talk to Detective Beech and learn about the murder of Jake Rogers. Jake was pushed down the stairs and had lots of money in his bank account.

Menu:
Go forward to the other end of the diner by the door.
Check the menu on the table at left (or by the door). See that certain letters are in different colors.
Red:    His
Green:    Journal
Blue:    is my
Pink:    Cash Cow
Xe: R3 is written by the dessert menu.

 Kitchen:
Enter the kitchen through the double doors on the left.

Pan left and check the black tub under the spill sign. Take the soup ladle.
Pick up and read the crumpled note on the left of the tub. Connie breaks a dance date with Daryl.
Pan right and look close at the tomatoes on the cutting board. Watch out is etched on the cutting board.
Bolt cutter:    Look under the table with the tomatoes. See a bolt cutter propping a pipe.
Take the bolt cutter and see the pipe leak. Use the soup ladle as replacement pipe prop for the bolt cutter.
Work schedule:    Pan right and look close at the work schedule on the center wall shelf.
The last entry is Te: L3


Click on the torn part at bottom right and Nancy comments on it.
There is a set of letters at the bottom.
Rearrange them by reading the letters one from top line and one from bottom line and then top, bottom...
Check yer eyesight in gym.

Closing procedure:    Look close at the paper tacked on the fridge at right.
See Jake's note. There is a line of numbers at the bottom and Hg: L3.
The first number is the line on the note and the second number after the period is the position of the word on that line.
1.3 (Daryl), 8.9 (brings), 6.7 (secrets), 4.4 (to), 5.4 (diner.),
4.4 (to), 12.5 (get), 4.9 (the), 8.5 (cash), 13.6 (for), 4.6 (a), 10.8 (life), 14.5 (so), 4.10 (finer).
Daryl brings secrets to diner. To get the cash for a life so finer.
Exit the diner.


Paseo del Mar High School:
Enter the high school and look around.

Jake Rogers' locker:
Turn left from the main display and forward to front left hallway.
Look close at the locker with the torn police tape at left.
Pick up the coin on top of the padlock of the locker left of Jake's.


Combination lock:
See a padlock that needs 4 numbers.
Open the cell phone; click and select phone. Check the numbers that form the name JAKE.
Enter 5253 on the padlock.
See an empty video case.
Pull out and read the English Essay book. A Treatise on Etiquette by Prudence Rutherford is marked with a piece of paper.
Read the Judo Today magazine. Read about the unknown last minute entry that won the 5th annual men's judo tournament.
Read about a break in at the Drug Station Pharmacy. Several vials of Hectinol were taken.


Bulletin boards:

Left locker-front hallway:    Turn left and look close at the bulletin board.
See a white note. The letters-words are read right to left.
Up, down, left, right
The first letters will help my plight.
He: u2


Front left side hallway:    Turn to the left and turn the corner. Look close at the bulletin board.
See that Hal Tanaka is the honor student of the month.


See another note above Hal's picture.
Form the words by using the next set of letters with previous words.
Find the morning edition And discover another crime, The answer is in black and white to who will do the time. 
Ir: D2


Go forward and take the coin on top of the trash bin on the right.
Back left side hallway:    Look close at the bulletin board.


Read the pink call note at right side of the board.
Kr: L2
The letters are scrambled to form a cryptogram.
Sinners on a vid.


Right of Gaiser Gym:    Go forward to end of hallway and turn right. Look close at the bulletin board at left.
See 3 white notes.
K: R1


The left note is upside down.
Nowhere   to turn to,       
Nowhere to hide,  
let the  books in the library,
be your guide.
     The middle note has words                  written from right to left and                               bottom to top.
     a symbol of kanji
     worn with great pride
    reflects big secrets
    that someone must hide
The right note is upside down and written from right to left.
He did what it took
to make the grade,
Even if it meant cheating.
To keep up his charade.


Left of the women's rest room:   
Take a coin from the racket in front of the closed sports equipment window.
Eye chart:    Remember the clue seen at the diner's work schedule.
Look close at the eye chart left of the big bin.
Read the eye chart from bottom up and right to left.
If anything happens to me look in my chemistry book page three zero five.

Hector Hulk Sanchez:   
Turn around from the eye chart and talk to the young man wearing a jersey with the number 80.
Judo poster:    Turn to the right and look close at the Self Defense poster.
The Crane School of Self-Defense has judo classes for men and women of all ages.
Soda machine:    See soda machines on the right.


_____________________________________________________________________________________________

Nancy Drew | Warnings at Waverly Academy | part 10_Final

Go back and give the snack sack to Corine. Take the stick drive with the essay from the desk.

Library computer: Go to the library computer. Use the stick drive on the USB box.
Click on the Waverly icon and then Academics. Click on the top right frame about winner of the Pen to Paper award. Click on download.
On the main page, open the preview folder of the essay. Read Corine's paper. So the last works of Poe disappeared.

Izzy: Talk to Izzy and find out that her paper is gone from her computer. She is definitely upset.
Rachel: Talk to Rachel in her room. They did not send the second Black Cat note.

Corine: Go back to the bedroom. Corine is not here.
Check her desk. Check the paper under the drafting papers and triangular ruler. See Izzy's password and steps to reformatting. Ah... Corine sabotaged Izzy's computer and erased her paper.
Check under the papers with the straight ruler. See a note about Cellar.

Cellar:
Go outside to brave the blizzard and enter the cellar door. Turn on the lights. Look around the cellar.

Furnace: Go to the old furnace at the corner. Hear a noise.

Plan: Pick up the missing modern plan right of the furnace door.
Automatically, Nancy compares that plan with the plan taken from the box with Hallowell's picture. A room is behind the furnace.
The modern plan has the label 'Dupin' and the levers of the furnace are numbered.

Last page of Hallowell's journal: Behind the Dupin grate, the black wood's chant shall someday reveal what history deemed lost, but only after someone's dogged curiosity and capacity for clear thought have proved that person to be worthy.
The Blackwood Society chant as recited by Izzy:
Three is fine but five is more. Even nineteen defeats four. Should just seven becomes lore, at least two will find the door.

Furnace plan: Study the Dupin numbered levers in the modern plan.
Turn the levers based on the Blackwood chant. A reset button is on the wall at right.
Turn the levers: 3 5 19 4 7 2. The grate opens.


Treasure: See the Black Cat with the unpublished Edgar Allan Poe book - the treasure Rita Hallowell hid.
The Black Cat takes the book and leaves Nancy locked in the cellar. The furnace door is closed.
Look at the pedestal's top and the stepping block triggers the swinging axe. The Pit and the Pendulum.

Colored stones and plate puzzle:  
Look at the mechanism on top of the stone pedestal.
Click on bottom right outside plate. Pull gold handle.
Click on top left outside plate. Pull gold handle.
Click on top right outside plate. Pull gold handle.
Click on bottom left outside plate. Pull gold handle.

Nancy Drew | Warnings at Waverly Academy | part 9_Star line puzzle

Raven: Review the raven page of Hallowell's journal.
Close observation of the wedge tail, large bill, shaggy breast ruff and elegantly long primary feathers lead to a wondrous conclusion. Reconstruction of these United States will lead to an even more wondrous conclusion but that is a subject for an altogether classroom.

Set the alarm: Time to look around at night. Set the alarm to 11 PM.
Classroom: Wake up at 11 PM.
Exit the room and go down the stairs.
Go forward to the locked double door at the hallway before the snack -Rec room.

Use the student ID card on the lock of the door. Enter the classroom and turn right.

Raven: See the raven on the post by the door.
Based on Hallowell's journal; press the tail, bill, breast and primary feathers.


Easter egg: Press the eye 3 times, the wing 2 times, tail 1 time.

Map:
The map tiles drops off.
Reconstruct the map now that the Oklahoma tile found under Nancy's desk at the bedroom is taken.
Place the coast states first and then work inland.
If done correctly, the raven turns and a secret compartment is seen.

Be sure to take a picture of the map!!
Take the raven sunburst token from the raven's secret compartment.

Rachel: See Rachel with a snack tray. Nancy follows Rachel to her bedroom.
Use the student ID card to open the locked door. Enter the room and see a secret door close.
Go to the left wall by the window.

Star line puzzle: See lines with starts at each junction.
The object of the puzzle is to light up the stars without crossing over an existing line.

The next day:
Snack Shop: Open the snack shop today.
Library computer: Read the homepage and see a blizzard warning.

Cellar:
Go outside to the cellar door. Enter the cellar and turn on the lights.
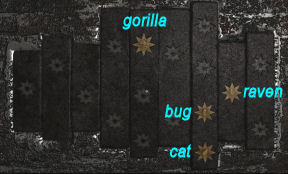
Starburst panel: Look close at the slats with starburst indents.
The 4 starburst tokens are automatically in 4 of the indents.

Easter Egg: Place the starburst on the slat that has 4 indents.
From top to bottom: Cat, bug, gorilla and raven.
See the slats fall of revealing an Easter Egg. Take the cat Easter Egg.

Pull back and continue with regular puzzle.

The object of the puzzle is to place the tokens at the correct indents.
Remember that there is a drawing of Black Cat and words - Other Poe Stories at the last page of Rita Hallowell's journal. It must be another clue.

Review the list of Poe Stories written on the Black Cat and other Poe Stories book page.
There are 17 starburst indents on the wall.
There are 17 Poe stories written on the book.
There are dates beside the stories. Using your own game notes, arrange the stories in chronological order.
Then note the chronological number of:
The Black Cat, The Murders in the Rue Morgue (that has a notation 'The ape did it' in the book), The Raven and The Gold Bug.

Place the respective tokens in those indents.
- The gorilla token on the 6th indent.
- The bug token on the 13th indent.
- The cat token on the 14th indent.
- The raven token on the 15th indent.


A compartment is seen when the slats fall off. Open the box. Take the cellar plan and the portrait of Rita Hallowell and Usher the cat.
Hallowell and Usher picture: Take a picture of Rita Hallowell and Usher. That is the last of the Waverly icon pictures.
Study the cellar plan and see that there is a room behind the old furnace.

Waverly iconic pictures:
Time upload the pictures to be checked. Go to the library computer. Click the USB box to attach the camera.

Click on Waverly icon and then About Us. Select Why Waverly? at left bar.
Download the pictures: Hollowell and Usher; the US map, Oak tree, Arch of the Ramsey Hall door, wood inlayed emblem and the trophy.

Rachel:
Go to Rachel's room and talk to her. She's happy about the pictures of the icons.
Now she wants the paper written by Corine uploaded on the Pen to Paper on the website.
Exit the room.

Corine's paper:
Text message (sometime): The message states that the Black Cat has bitten Izzy Bad.
Corine: Talk to Corine about the paper. She wants a snack first.
On the way out of the room, see the second Black Cat note slipped under the door.

Snack shop: Open the snack shop.


________________________________________________________________________

part 8_Follow Casper<<<---                                                                               --->>>part 10_Final

Nancy Drew | Warnings at Waverly Academy | part 8_Follow Casper

Casper the albino squirrel:
Time to sleep.
Go to Nancy and Corine's bedroom. Talk to Corine.
Set the clock in the cell phone to alarm at 6AM.
Casper the albino squirrel: In the middle of the night, Nancy is awakened by a tapping noise.
See Casper with the sunburst token in his mouth.
Open the window and climb out to follow Casper.

Senior


Junior


Chanters: Hear chanting. Nancy looks down and sees 6 black gowned chanters and one blue gowned chanter. Climb down and go back to the room. Exit the bedroom; go down the stairs and outside.
Go to the base of the oak tree. Pick up a ribbon-barrette from the ground.
Go back to the bedroom and set the alarm again to early morning.

Wake up:
The alarm goes off and the cell phone falls on the floor.
Look under the desk beside Nancy's bed.
Take the cell phone, the second Black Cat note sent to Danielle and tile.
Pick up the Black Cat note for Nancy slipped under the door.
Talk to Corine about the barrette.
Mel: Go to Mel's bedroom and ask her about the barrette.
Learn about the Blackwood Society that started 2 years after the school was founded.

Text message (sometime): Read a message sent to Becca-Nancy about the Poe book and Izzy's bedroom.

Izzy and Leela's bedroom:
Go to the locked door across Rachel's bedroom.
Knock on the door. No one is inside.

Use the student ID card on the lock of the door. Enter and look around.

See the athletic equipments by the bed at left. Check what is under the dumbbells.
Missing Poe book: Take the missing book by Edgar Allan Poe: The Black Cat.

Open the book. See a list of stories written by Poe with dates after the titles and 4 sunbursts on top of the list. Go to the desk and check out Izzy's picture. Turn it over by clicking again.

Take the key behind the picture. Check out Jacob's picture.

Izzy's trunk:
Go to the foot of Izzy's bed and look close at the trunk.
Use the key just taken on the trunk. Examine the contents and see the blue gown of the leader of the chanters.

Find the words to the chant:
Go down to the library.
Talk to Izzy about the chant. Three is fine but five is more. Even nineteen defeats four. Should just seven become lore, at least two will find the door.

Snack time: Time to do the daily opening of the snack shop.


________________________________________________________________________

part 7_Piano keys<<<---                                                                        --->>>part 9_Star line puzzle


Nancy Drew | Warnings at Waverly Academy | part 7_Piano keys

Take the Musical Notation book. Read the book.
Remember that Rita Hallowell's notes in the journal mentions 1st low bass, then coloratura. The book states that Coloratura Soprano's range is from C4 to F6 and Low Bass's range is from C2 to F4.

Piano: Look close at the piano keys.
Based on the book and the notations on the lamp shades, play the piano.
Press the keys noted on the right lampshade for the low bass and the keys noted on the left lampshade for the coloratura keys.
Play:
- Click on the left side of the piano keys.
- Play the right lampshade keys (low bass): D2 A2 B2 D3 F3 A2 C2


- Pull back. Click on the right side of the piano keys.
- Play the left lampshade keys (coloratura): E6 A5 B5 C5 E5 B4 C5 G4 C4


A secret compartment opens. Take the cat sunburst token.

Celebratory Dinner:
Review the second to the last page of Hallowell's journal.
With a Celebratory Dinner, an elegant nine course meal serf with perfect etiquette. I bid the last of them farewell.

Victorian Dinner display case: Go to the display case across the door of the library.
See that the Menu card of am 1871 Celebratory Dinner was checked out by Leela Yadav.

Leela:
Go to Rec room and talk to Leela.
She will give the 1871 dinner menu if you beat her in a game.
Choose the game you want to play and beat Leela.
Pick up the menu.

Izzy: Talk to Izzy in the library.

Victorian Menu:
Go to the computer. Do a search using Menu as the search word.
See that Formal Victorian Dining: The Right Fork for the Menu by Demetria Espinoza was checked out by Rachel Hubbard.

Rachel: Go to Rachel's bedroom and talk to her about the book.
She is using the book right now. But if Nancy gets her math notebook from Mel, she can work on that while she loans you the Menu book.

Mel: Go to Mel's bedroom and ask about the math notebook. Mel left it in the library.

Library: Look around for the notebook.
Lost and Found: Look at the Lost and Found drawer left of the reception counter.
There is numeric lock and MMDCXLI is etched on the wood.
If you need help in translating the Roman numerals, check the book displayed on the reception counter.
Look close at the lock. Enter the translated MMDCXLI = 2641.
Take the calculus notebook.

Rachel: Go to Rachel and give her the calculus notebook.
Take the Formal Victorian Dining: The Right Fork for the Menu book.
Read the book and learn the different fork, spoon and knife used in a Victorian Menu.
Take a student ID card at page 41 of the book.

Using the Formal Victorian Dining book, find out the flatware used in the 1871 Celebratory Menu.


Open the Celebratory Dinner display cabinet using the key taken from the snack shop storage closet.
Pull down-click the flatware as shown on the chart in the order used during the 1871 Celebratory Menu.
Take the gorilla sunburst token.

Go to Nancy and Corine's bedroom. Talk to Corine.


__________________________________________________________________________________________

part 6_Orthographic views<<<-----                              ----->>>part 8_Follow Casper

Nancy Drew | Warnings at Waverly Academy | part 6_Orthographic views

Orthographic views:
Take the drafting folder.
Place them in the appropriate frames.

When done talk to Corine. Take the cabinet key.

The Story of Four book:
Go back to the library and the Special Collections shelf.
Use the key given by Corine to unlock the cabinet.
Read The Story of Four book by Madeline Moore. Learn about Rita Hallowell, one of 4 founders of the Waverly Academy and her relationship with Edgar Allan Poe.
Take a closer look at the picture at the last page. Rita Hallowell is the one at far right and touching the cornerstone. The plaque-cornerstone is different from the one we saw outside.


Cornerstone-plaque:
Go outside to the cornerstone at side of the building.
Look close at the square at the center. This one has an empty space at center while the picture has none.
The aim is to arrange the 4 tiles so that there is no empty space.
The slab opens and shows a starburst token on top of an old book.
Casper the albino squirrel comes and takes the starburst token.


Take the journal of Rita Hallowell. Read the journal completely.
Pull back and get a call from Ned. Talk to Ned.

Sher's lamp and piano rendition:
Read the second page of the journal about Usher the cats' lamps and the piano rendition of their musical narration.
Even the warmth of his favorite lamps no longer calms him unless accompanied by piano rendition of their musical narration.
There's a notation on the page: 1st low bass, then coloratura.
Lamps: Go back inside and check the 2 lamps on the tables at left of the foyer.

Computer search:
Click the Library catalog icon and then the 'search the catalog' button.
Type in piano. The Musical Notation: Piano book by Virtuosi was checked out by Mel Corbalis.
Mel: Go to Mel's room. Talk to her about the music theory book. She wants milk and cookies.
Snack shop: Open the snack shop and do the preparations. If there is a teacher order, do the preparation as fast as you can.

Piano book:
Go back to Mel and give her the sack with the snack.


_________________________________________________________________________________________________

part 5_IP number<<<-----                                                   ----->>>part 7_Piano keys

1.12.2011

Nancy Drew | Warnings at Waverly Academy | part 5_IP number

Check data source:
Open the plagiarized paper in inventory. Type in on the blank space any database source code-number from the plagiarized paper. I used 3043.624.1.
Click 'search' and then view poster IP: 'view'.

See a list of numbers that might be part of the IP number.
Based on Mel's observation that the IP does not have any repeating number, select-click the number from the column to enter it at the bottom.
Enter 69.57.284.103.
Then click 'submit IP'. The poster is Jacob Pryce and posted on Nov.18 (day after Mel submitted her paper).

Valedictorian webpage:
See information and the pictures of the Valedictorian candidates.
The aim is to place the pictures and information in appropriate columns.
Snack shop: Click on snack shop to open for service. When you finish pick up the key that fell from above.

Rachel:
Go to Rachel's room and talk to her. If the webpage is correct, she'll ask that you take pictures of Waverly icons. Take the list of the icons.


Mel Corbalis:
Go to Mel's room and talk to her about the dates.
She gives an old newspaper clipping about the Odyssey Championship trophy. It is the first Academic win of the school. Read it in inventory.

Waverly's icons:

-1st Academic win trophy: Based on the paper given by Mel, the 1st Academic trophy is the Odyssey Championship trophy.
See trophies that are displayed. Open the glass door.
Take the Odyssey Championship trophy at center.
Take a picture of the Odyssey Championship trophy.

-Wood inlaid school emblem: Go to the main door of Ramsey Hall.
With you back near the main door look down at the wood inlaid school emblem.
Zoom in and pan to get a close up of the crest-emblem. Take a picture.

-Oak tree: Turn left and walk the path to the enclosed oak tree at left.
See the albino squirrel, Casper up the oak tree.
Take a picture of the twisty trunk of the oak tree.

- Entry arch to Waverly: Exit through the door and then turn around.
Take a picture of the arched entryway.

Cellar:
Turn the corner and forward to the cellar door.
Use the key that dropped down on the snack bar. Open the cellar door and go down.

Research Moore from Mel's sampler:
Library computer: Go to the computer. Check all the pages available in the Waverly website.
Use the Library catalog. Click on search catalog at bottom left. Type in Moore.
See a book: The Story of Four at the Special Collections shelf.
Pull back and turn left. See a glass book cabinet. Look close and see the Story of Four by Madeline Moore book inside. The cabinet is locked.

Corine:
Go to Corine's room and ask her as library assistant about the key to the cabinet.
She'll give the key if Nancy finished the orthographic views assignment for her.
Orthographic views: Take the drafting folder.


_______________________________________________________________________________________________

part 4_Valedictorian webpage<<<-----                     ----->>>part 6_Orthographic views

Nancy Drew | Warnings at Waverly Academy | part 4_Valedictorian webpage

Ask about Megan's picture to Leela. She will give Megan's picture if you win a game.

Library:
Go to the library.
Download the pictures: Now that you have all 6 pictures, download all of them.

Rachel:
Go to Rachel's room and talk to her.
If the pictures are all correct, she'll ask that you enter them in the webpage.
Enter the pictures in the webpage: Go back down to the library and the computer.
Click on the Waverly icon and then Academics. Click on Valedictorian Race frame at right.

Valedictorian webpage:    See information and the pictures of the Valedictorian candidates.
The aim is to place the pictures and information in appropriate columns.


Plagiarism:
Mel Corbalis: Go forward and turn right around the lounge area. Go forward and knock on the first door on the left.
Talk to Mel about plagiarized paper. Learn about Paper Trail.
Mel noted that none of the digits of the IP of the paper she supposedly stole from are repeated.
Take the plagiarized paper. It is dated 11/17.
She asks that Nancy work out the IP of the person who posted the paper she supposedly stolen from. Talk to Mel completely.


Library Computer:
Go to computer and enter Waverly site, Academics, Resources and Paper Trail.

Check data source:
Open the plagiarized paper in inventory. Type in on the blank space any database source code-number from the plagiarized paper. I used 3043.624.1.


_____________________________________________________________________________________________

part 3_DNA Model<<<-----                                                       ----->>>part 5_IP number

Nancy Drew | Warnings at Waverly Academy | part 3_DNA Model

Library desk: 
Turn around from Izzy and go to the reception desk. See the name plate states that Corine is the library assistant. Pan right and go to the computer.
Computer:
Look close at the computer.
Click on Waverly icon. It asks for a password.
Click on 'forgot password'. It says to see student body president for assistance.

Password:
 Talk to Izzy at other side of the room about password. She blatantly drops a hint she needs help with a DNA model.

When done talk to Izzy. She gives the password.

Go to the computer.
USB port box: Click on the USB box in front of the monitor. The camera is attached automatically.
Log in: Click on monitor and Waverly icon.
Using your own keyboard, enter the password given by Izzy. It is found in the journal's observation:
 WAC35NE136. Click OK.

Homepage: See that Becca is in charge of the Snack shop. This duty has to be done at least once a day. Failure will result in 3 demerits.
The Black Cat and Other Poe Stories by Edgar Allan Poe is missing.
About Us: Read about Waverly Academy.
Academics: Click on the Valedictorian Race frame at right. Now that the camera is attached on the USB port, click on a download button.
Click download at right to download pictures. Scroll pictures and download Izzy, Mel and Corine's pictures.
Student Life: Read about Casper the squirrel (2 pages) and the security blotter.

Download the pictures:
Now that you have all 6 pictures, download all of them.
Go to the computer. Click on the USB port box in front of the monitor.

Library desk:
Turn around from Izzy and go to the reception desk. See the name plate states that Corine is the library assistant. Pan right and go to the computer.

You need Megan Vargas' picture so call her again, after go talk to Leela in the Rec room.
Ask about Megan's picture. She will give Megan's picture if you win a game.


________________________________________________________________________________________________

part 2_Take pictures<<<-----                                    ----->>>part 4_Valedictorian webpage


Nancy Drew | Warnings at Waverly Academy | part 2_Take pictures

Knock on Rachel's room.
Enter and talk completely with Rachel. She needs help on a web design project. She's from Pittsburgh and loves math.
Rachel wants you to take pictures of valedictorian candidates and upload them at the Meet the Candidates link at the Academic page of the Waverly website. 

Megan Vargas:
At the hallway, use the cell phone and scroll to Megan's phone number given by Mel. Press the call button.
Talk completely with Megan. She got 2 Black Cat notes.
Her cell phone camera is broken. Megan says that Leela might have a picture of hers.


_______________________________________________________________________________________________

part 1_Becca Sawyer<<<-----                                                 ----->>>part 3_DNA Model


Nancy Drew | Warnings at Waverly Academy | part 1_Becca Sawyer

Nancy is asked to pose as a student named Becca Sawyer at the Waverly Academy. She is to find out who has been writing threatening letters and causing accidents. 

The Valedictorian Candidates of Ramsey Hall:  Corine Myers; Izzy Romero; Rachel Hubbard; Mel Corbalis; Leela Yadav.


___________________________________________________________________________
----->>>part 2_Take pictures

1.11.2011

Nancy Drew | Shadow at the Water's Edge | Easter Eggs

Let's talk about Easter eggs hidden in the game Nancy Drew Shadow of the water. 


Egg # 1
If you open the box, hidden in a desk Miwako, the second time, it will give you an Easter egg!


Egg # 2
Print the "photo" ghost that Yumi sent, and the photo machine will give an Easter egg


 Egg # 3 
Using the recorder EGF against the stone lantern in a garden, you can record sound, listening to the sound at the Rentaro shed and a mysterious egg hidden under the cracked floor at the working sauna and collect the egg.


Egg # 4
Earn a 15-30 Pachinko balls, then put them in the slot for balls, and instantly one of the prizes varies on an Easter egg, which is worth all the 1 ball.


Nancy Drew | Legend of Crystal Skull | Part 13_FINAL


Lightning rod:
Go forward to the left side of the fountain. Go left to the fireflies.
Move the ivies off the wall. Push the 2 stones to the back.

Go through the cemetery gate. Turn around and go to the broken wall at right.
Now that you protruded the stones, go up and take the lightning rod.

Bruno Bolet's crypt: Go to the buzzard crypt.
Check the drawing taken from the eyeball cabinet.

Look down at the circle with Bruno's name.
Place the lightning rod on the hole.
Place the skeleton arm on top of the rod.
Place the jeweled eyeball on the skeleton's hand.

The circle on the floor lowers down to the crypt. See the Whisperer!
Take the Whisperer. Watch as the lid starts to close. The villain arrives and will help Nancy up.

Nancy tosses the crystal skull to the villain.
The villain explains the reasoning for the nefarious acts done and leaves Nancy to her fate.
Immediately turn around and click on the wall.

Memory puzzle: This is a random puzzle. Click on duplicated pictures to turn them around. The flashes of lightning light up and darken the room.
When all the pieces are done, the lift rises up.

Go to the cemetery, turn right and forward to the river-swamp.

Tip the log to get help from Bernie.

Watch what happens.

Nancy Drew | Legend of Crystal Skull | Part 12_Jean Lafitte


Jolly Rogers meeting: Turn left and go forward to the double metal doors.
Knock on the door. Select Scuttled bones as password.
Hear them say Jean Lafitte. Oops! That cell phone!
Watch what happens to Bess.

As Nancy at the secret room:
Small chest: Take the small chest and enter Jean Lafitte on the padlock. Take eyeball 24.


Iggy the optometrist:
Get another loquat from the wasp infested loquat tree.
Go back to the secret room. Use the loquat on the vent to call Iggy.
Dress Iggy as an optometrist: Head lens, name tag on collar and ophthalmoscope on the waist.
Pull back to get Iggy going. Take eyeball 25.

Plentiful Pirates and Nautical Nonsense:

Go to the eyeball cabinet with an octopus and ship depicted on the door.
All 25 eyeballs are placed in the cabinet. Click to see that they can be moved up-down-right-left.
Read the 'Plentiful Pirates and Nautical Nonsense' story in the 'Short Stories for Tired Eyes' book in inventory.
Position the eyeballs by following the story and looking for words that forms a direction. The numbers at the bottom of the page shows how many directional words are in that page.


Take the drawing and the jeweled eyeball.

Nancy Drew | Legend of Crystal Skull | Part 11_Bruno's dog


Find the name of Bruno's dog:
Call Bess and get her to look at the picture of Bruno in the box at Zeke's.

As Bess, talk to Lamont. He will recommend the gumbo from the gumbo shop outside the store but 'watch the hot sauce'. It gives his stomach instant fits. Aha!
Exit the store and go to the gumbo shop truck. Order a gumbo to go.

Go to Zeke's and give the gumbo to Lamont. Uh Oh!
Go to the backroom and open the box. Click-hold-move the picture of the boy and dog and see that the name is Grant.

Play as Nancy:
 Go back to the book at the great room and search for a Grant.
Turn to page 82 and see the name Derek Grant at Writhing Roots Mausoleum.
Find Writhing Roots Mausoleum in the miniature cemetery. Go to Writhing Roots Mausoleum. Open the box at the bottom of the headstone. Take eyeball 18 and a little pirate hat.


Loquat tree and the wasps: Take the path at left before going to the back door of the house.
Go forward and see a loquat tree and a bug sprayer. Take the bug sprayer and click on the tree.
The object of the puzzle is to kill all the wasps and get a loquat.
Kill the red wasps immediately. They sting and after a number of stings by the red wasps, game ends and second chance happens.
Take the loquat fruit.

Iggy the pirate: Go to the great room; enter the secret hallway and the secret room.
Look at the air vent above the dummy where Iggy hides. Place the loquat on the vent.
See Iggy stand beside his wardrobe. Open the wardrobe.
Dress Iggy in a pirate costume: pirate hat on his head, white collar with parrot on his neck and sword belt on his waist.


Pull back and Iggy retrieves a small chest.
Read the plaque on top of the chest: The name that opens every Jolly Roger meeting opens me.

Jolly Roger name:
Go to the desk and look at the calendar on the left. Open through the pages and at May 31, if Nancy hasn't said it earlier, she says that it is today. The meeting is at Rampart and Dumaine and the password is Scuttle Bones.

Call Bess to infiltrate the meeting. She has to wear a costume. So she has to enter Zeke's store and retrieve the skeleton costume.

As Bess: Go to the alley right of the table. Turn left to Zeke's locked back door after the trash bin.
Padlock: Look close at the lock of Zeke's door.
See a number pad on the lock. The x key resets the puzzle.

Use the compact in inventory to dust the key pads. See 5 numbers light up.
Using the amount of powder on the keys, deduce the sequence of the 5 numbers. The more powder, the first in the sequence in will be.
Press 2 8 9 0 5.


Enter and open the box. Wear the skeleton costume.
Exit through the emergency door.

Nancy Drew | Legend of Crystal Skull | Part 10_Cemetery Hunt


Cemetery denizen hunt:
Go to the great room.
Read the skull note taken from the eye socket of the pirate dummy
Go to the book at the corner that has the list of people buried in the cemetery.
The object of the puzzle is to identify the person in the seen clue; go to its headstone, read a new clue and look for the next headstone.
The book has the first name, surname and the area in the cemetery they are buried in.
Use the miniature cemetery to locate the area and then go to the cemetery next door.

Read the clue in the paper taken from the pirate dummy's eye socket.

The last denizen buried on my guard, will start you a-hunting through the graveyard, what's written on the headstone will lead you to another, And so on and so forth til tiny treasure you discover.
Search the book for the last entry. Turn to page 91. See that it is Tammy Tassleman in Terra Siesta.


Couldn't sleep without a peep, so when she died we buried her deep.
Go back to the book at the great room and search for a name that fits the clue.
Turn to page 79 and see the name Constance Norring at Crowing Crypts.

Never early, never late.
Go back to the book at the great room and search for a name that fits the clue.
Turn to page 84 and see the name Justin Thyme at Sorrow Park.

All dressed up with no place to go.
Go back to the book at the great room and search for a name that fits the clue.
Turn to page 85 and see the name Manny Kinn at Writhing Roots.

Died in debt.
Go back to the book at the great room and search for a name that fits the clue.
Turn to page 77 and see the name Owen Moore at Sorrow Park.

A standup person.
Go back to the book at the great room and search for a name that fits the clue.
Turn to page 84 and see the name Neil Down at Crowing Crypts.

All that's left of me are these old bones.
Go back to the book at the great room and search for a name that fits the clue.
Turn to page 86 and see the name Myra Maines at Terra Siesta.

Bloomed too late, pruned too early.
Go back to the book at the great room and search for a name that fits the clue.
Turn to page 85 and see the name Rose Winterspring at Slumber Gardens.

She would have given you the shirt off her back.
Go back to the book at the great room and search for a name that fits the clue.
Turn to page 78 and see the name Polly Ester Givens at Forty Winks Mausoleum.

Find Forty Winks Mausoleum in the miniature cemetery. Go to Forty Winks Mausoleum and click on the etched Givens. Take the scroll.
Same name as my dog at ten, Moved from his grave and buried again.