11.05.2012

Enigma puzzle | Nancy Drew: The Captive Curse

Security Room:

Sit down at the console, then take a closer look at the panel on the right. A note above the panel tells you how the Enigma works. Click on the red lever on the right to open the panel, then click on the top left part to open it. Use ROTOR #1 and ROTOR #2 from your inventory on the missing slots. Click the red lever again to trigger a puzzle.

Remember that German vocabulary from earlier? This is where it comes into play. Notice the symbols in the top right corner: Sun, Moon, and Comet. The German words for these are Sonne, Mond, and Komet.

Rotate the rotor dials so their initials are “S, M, K”.


The real message will be revealed once you've completed typing, and will read “Karl's Day-planner-- Eight, Two, Six, One.” Click on the tape to collect it.


Now notice the symbols in the top right corner: Bat, Castle, and Knight. The German words for these are Fledermaus, Burg, and Ritter. 


Rotate the rotor dials so their initials are “F, B, R”.


"The Freiherr's daughter is step one.” 


(And later in the game)

Notice the pictures: Mouse, Dragon, and Unicorn. Recall the German vocabulary for these words:Maus, Drache, and Einhorn. 
Rotate the rotors so they read “M, D, E”.

Upon completing it, the true message will be revealed: “Legend ending: Find young woman to cast as the victim.”

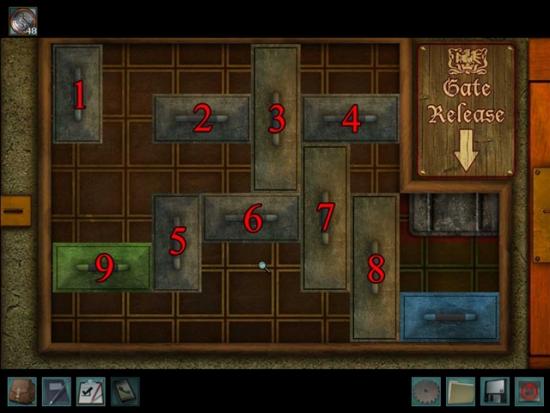

Panel Gate Puzzel | Nancy Drew: The Captive Curse

Courtyard

Nancy will spot the monster and follow it through the entrance gate, only to find herself trapped. Proceed forward and the monster will pop out, frightening Nancy, before wandering away.Once this has happened, turn left and notice a panel on the wall. Click the loose brick above the panel to remove it and reveal the PANEL KEY.
Slide the colored bars into their correct slots to release the gate mechanism. 


1 up, 2 and 3 left, 4 up, 5 all the way to the right.


5 up, 9 (green) right a single space, 1 down, 2 left, 5 up, 6 left, 5 down, 3 down, 4 left, 3 up, 7 up, 8 up, 9 all the way to the right.


6 up, 9 right, 1 down, 2 left, 5 up, 7 left, 6 down, 3 down, 4 left, 8 up, and 9 all the way to the right.


The gate is open again. Click on the piece of cloth hanging from the portcullis for a clue.
Return to the Castle Foyer.


Security camera puzzle | Nancy Drew: The Captive Curse

Security Room:

Take a closer look at the metal cover in the center of the console. Use the 3-pronged CONTROL KEY from your inventory on the On-Off grid. Switch it On.


Take a closer look at the metal cover and open it, revealing a puzzle.
Click on the correct numbers in the correct order so that all buttons turn green after five turns. 


The order is as follows: 10, 8, 2, 7, 6. 


Now the security cameras have been activated. You can click on the various buttons beneath them to change which camera you're observing. Notice the security camera for the Gift Shop: Renate is doing something with the third cuckoo clock from the left.

Musical Chime Puzzle | Nancy Drew: The Captive Curse

Castle Foyer

Return to the Castle Foyer and examine the Glockenspiel in the corner. Play the correct chimes in correct order.


Upon completing the musical chime correctly, the Glockenspiel will play and a secret switch will appear on the left wall. Examine and press the button to open a secret door into the security room.

Swapping Letters Puzzle | Nancy Drew: The Captive Curse

Castle Foyer

Talk with Lukas again, informing him that Karl is distracted. Once Lukas leaves pick up the paper he left behind.

Click on the coded area of the paper for a closer view, and to trigger the puzzle. Switch letters from the same vertical column to form words, once a word is correct, it will lock in place.


Once you've completed the clue, visit the locations it mentions to verify the code letters. They are as follows:
*--Upstairs Portrait of Else-- Go up the left set of stairs leading to Nancy's Room and examine the painting (use the DICTIONARY on the plaque to translate it). Note the letter “G” in the painting.
*--Florist Letter-- Go outside to the Courtyard and examine the door of the Florist (use the DICTIONARY for translating the signs as needed). Note the letter “D”.
*--Hallway Bookstand-- Enter the hallway leading to Karl's Office and examine the alcoves until you find the one with the book. Note the letter “B”.
*--Castle Gate's Bell-- Return to the Courtyard and exit the castle gate, then turn around and look at the doorbell on the right. Note the letter “G”.
*--Furnace-- Return to the Glass Shop and open the furnace as per usual and look immediately above the lever. Note the letter “A”.
The code letters are: GDBGA.


Renate's bag Puzzle | Nancy Drew: The Captive Curse

Dining Room:

Talk with Renate abour your torn clothes, then talk to her about all the remaining dialogue options except the food. Once you've finished all the other conversations, ask her if she's hungry and offer her the black forest cake. She will fall asleep after eating it.

Arrange the objects inside Renate's bag so that you can access the box at the bottom.

Possible solution to the puzzle.

4.09.2011

Nancy Drew | The Phantom of Venice | Part 2 | Fango's office


Get the tracking device:    Go to Campo Santa Maria Formosa.
Open the PDA and review what the tracking device looks like.


Enter the Costumi di Vera.
Save here! Immediately click using the tip of the cursor on the white pill right of the box on the left side of the shelf at back wall. You get a second chance if the pill self destruct.
Leave the store and the Campo.

Enter Fango's office:    Go to Campo del Frari. Enter the building.
See that Fango's office is locked. Looks like I have to pick this lock somehow...
Read the Sassy Detective magazine and learn how to pick a lock.

Ca' Nascosta:    Go back to Ca' Nascosta and then to the bedroom. The phone rings. Talk to Prudence Rutherford, the former owner of Ca' Nascosta. Try calling Mrs. Rutherford later and get a funny caller ID dialogue.
Take hairpins from Nancy's makeup kit inside the wardrobe.
Go back to Fango's office.

Pick the lock of office door:    Use the hairpin on the lock.
See 6 pins. The objective is to get the pins aligned to have all white on top of the line and the brown below. This is a random puzzle.


Search the room:    Look around the room.

Check the cabinet at the middle. See a Commedia dell'Arte poster of mask. Some are crossed out, except for Scaramuccia, Il Capitano, Brighella, Arlecchino and Il Dottore at the center.

Feed the pigeon:    Look close at the pigeon on the window shelf. It has yellow legs.
Place the bird seed in front of the pigeon. Place the tracking device on the seeds. Watch the bird eats it.
If unsuccessful this time, check the PDA and track the pigeon.

Hide:    Uh Oh! Fango is coming back. Immediately, go to the left of the room and enter the cabinet with the poster.
Watch as Fango moves around the office. Exit the cabinet. Put the loose poster back in place.

Computer:    Go around the desk and face the laptop.
It asks for a password. See that the icon is the mask of Il Capitano as seen in the poster.
Type in Il Capitano. Click on the chess icon and see that Gina's Chessboard server is down.
Check the trash. See that he cancelled plane reservations to Tahiti and later to Aruba.
Check all the chess logs. See that Fango plays chess with Scaramuccia.

Follow the pigeon:    Exit the office.
At the map, open the PDA. Click on 'track'. See arrows that would show where the bird has flown.
The arrows point to south and west. Go to Campo Santa Margherita, SW of the office.
See a lot of birds in front of the Casa dei Giochi which translate as House of Games.
Look for a pigeon with yellow legs and then click to see if it is the one we fed.
Take the message from the leg of the pigeon. See that the message is hello!


Click on the message in close up and the birds fly away. Automatically, Sophia calls on the PDA. She wants the message checked for a microdot.

Garbage interest:    Go to the alley left of the piazza.
See a propane tank container that has a 4 digit lock on it.
To the right is a garbage bin. Check what is inside completely.
After some interesting discarded items from previous Nancy games, read and take a Scotland Report about Colin Baxter aka Justin Mathias Beaumont.
After more previous game garbage, see  a letter to Enrico Tazza from the Doppeler Institute about Samantha Quick. Use the Italian dictionary to translate the letter. She will be coming after the Carnival. She can be identified by what she will be wearing: red dress, white gloves, black sunglasses and has blond hair.

Check the message for a microdot:
Go back to the Ca' Nascosta.
Chocolates:    See a box of chocolate on the table. It is for Il Dottore.

Go up the steps and hear the 3 talking about Nancy. Enter the Great room.
Talk to Helena and learn about her immersion to and her knowledge about the Machiano case.
Talk to Colin about the microscope. Talk to him again about the art theft. He admits his past to Nancy and learn about what Margherita asked him to do.
Microscope:    Click the message on the microscope.
Read: Il Dottore requests you to change the safe room lock combination to 43556.
Margherita:    Go up to the balcony and talk to Margherita. She gives the impression that she doesn't like Nancy.
Learn about her thoughts concerning Helena, how to make money at Rialto market and about Colin.
There's a letter on the table. Try to read it.
Report:    Go to bedroom or the bedroom balcony or to the front gate and call Sophia using the PDA.

4.08.2011

Nancy Drew| The Phantom of Venice | Part 1


Prudence Rutherford, who knows Nancy from "Secret of the Scarlet Hand", has asked her to come to Venice. There Nancy go help the Italian police (GdiF)  to solve a mysterious case. Someone who is wrapped in a cape and mask and called "The Phantom"  is stealing precious works of art.
Nancy must stay undercover and must stay in the palazzo of Margherita Faubourg.


Nancy wakes up inside an ornately decorated red room. Look around the room.
Helena:    Go forward after rising from the bed. Look at the picture on the dresser. This is Helena, the roommate.
Check the postcards and the notes on the back that are on the table. Her parents and a friend are in Germany. She has friends named Killian in Chicago IL.

The phone is by Helena's bed. Go outside the balcony and see the waterways of Venice.

Look at the left side of the balcony door and see Nancy's bed. Check the bathroom by the Nancy's wardrobe. Going to the bathroom often might earn you a Lavatorio Star at end of the game.

Dress for the day:    Open the wardrobe. Open each drawer and select the outfit you want Nancy to wear: from top of her head to the shoes of choice. Changing your outfit frequently might earn you a Fashionista Star at end of the game.

Check the makeup bag on top of the drawer. See the outfit your wearing at top left of the screen. See also that the purse has 200 Euros.

Check the book: An Interactive Guide to Venice on top of the desk left of the door. Learn the history of Venice, major sights to see, the famous gelato, Commedia dell'Arte, Carnevale and learn some Common Italian words and phrases. Press the red button to hear the words pronounced.
Exit the room.

Great room:    Turn left and talk to man working on restoring the walls.

Colin Baxter:    Learn all about tesserae. He's English and studied at Oxford University. He shows his tiles. After a while pull back to stop the tile show.
See an Etruscan bronze statuette on his workbench. He mentions a package for Nancy outside.

Balcony:    Turn around from Colin and go up to the balcony

Margherita Faubourg:    Talk to the owner of Ca' Nascosta sunbathing.
Look around and see some flowers that are covered by bees.

Gate:    Exit the balcony and then through the door at right to be outside.

Helena Berg:    Go down the stairs and meet Helena abruptly.
Pick up the letters; one of which is from her friend from the US, Hildegard Killian.
Learn the assignment:

Parcel:    Pick up the parcel from the table. Take the ATM card from Banco dell' Oro.
There is an ATM machine at Piazza San Marco that should be sued to activate the card.
Read the newspaper. Learn about the latest item stolen by The Phantom - the Chalice from Convent of St Gervase.

Map:    Exit through the gate and see the map.
See that there are 3 ways to go: Black lines are by foot. The water boats (V) are on the red lines and the gondoliers are the blue lines. The gondoliers charge money; try it to have the experience but remember that you are on a budget. Hear the lovely song sang by the gondoliers and sightsee at the waterways of Venice. If you do ride with the gondoliers often to listen them sing; you might earn the Musical Muse Star at end of the game.
Click on a place to travel one leg at a time. Click again on the place with an eye icon to check some places of interest.

Piazza San Marco:    Go to Piazza San Marco at bottom right of the map.
Pigeon food:     Click to enter the bank at left. See a bird food dispenser on the left. Get some for 5 Euros.

Banco dell' Oro:    Enter the bank at left.
Use the ATM card on the slot. Read the instructions about the assignment. Antonio Fango is to be watched using the binoculars and an alert will be given by the PDA whenever he is at his office in the Argon building. The office can be seen at the balcony of Ca' Nascosta.
Press home button and then the Case Dossier. Take the PDA and binoculars.

Kiosk:    Exit the bank. Look close at the kiosk. See some things to buy.

Exit the piazza. Go back to the Ca' Nascosta.

Ca' Nascosta:    The pager beeps. Time to go to work.
Balcony:    Go up to the balcony at top of the house. Stand behind Margherita and use the binoculars on the window of the Argon building.
See Fango take something from a pigeon that landed on the window. Fango leaves the room.

Bedroom:    Nancy automatically reports to Sophia Leporace. Sophia wants the pigeon be fed a tracking device. The device is to be picked up at a costume shop in Campo Santa Maria Formosa.
Nancy has to find out where the pigeon goes and to discover what the message contains.
Call Prudence Rutherford on the phone and see if you can connect with her.

Talk to Helena.
Feed and follow the pigeon:    Exit the house.
Get the tracking device:    Go to Campo Santa Maria Formosa.

1.13.2011

Nancy Drew | Secrets Can Kill (Remastered) | part 5 Final

Aunt Eloise's home:
Go home and enter the living room.
Open the TV cabinet. Turn the TV on and use the video cassette with red line on the video recorder.
Watch and see another evidence for blackmailing someone else. Jake also has plans for another source of money.
After viewing the tape, hear someone come in. Take the video cassette from recorder. Turn off TV.
Enter the foyer.
See and talk to the baddie. The baddie wants the tape. Reply with the wrong answer twice only to get more info. The third wrong answer gets you hit and a second chance.
Then respond that the tape is behind the tapestry. Remember Aunt Eloise's note about the combination.
When asked for the combination, select incorrect codes. If the correct answer is given, game ends with second chance.
Aunt Eloise's security system caught the baddie.


_________________________________________________________________________________________________

Nancy Drew | Secrets Can Kill (Remastered) | part 4_Jake's box

Boiler room:
Enter the school and go right. Turn right at side hallway and look close at the maintenance room door with a Braille lock.
The lock's keypad is in Braille. Aunt Eloise's computer states that the password is NOTE.
The library's reference area has a Braille book. Enter NOTE in Braille.
The light turns green. Enter through door.


Press the service elevator button. Go down to the boiler room.

Daryl Gray:
Exit the school and go to the diner. Talk to Daryl.
Daryl hands a note from Dillon HVAC. The note states that he has the solution to the mystery and wants a meet at the HS basement of the maintenance room.
Exit the diner and go back to the school.

Boiler room:
Enter the school and go right. Turn right at side hallway and look close at the maintenance room door with a Braille lock.
See that the boiler is in full blast and the gauges are on maximum.
The levers are padlocked.
This is a timed puzzle but you get a second chance if you run out of time.


Padlock:
If you have the bolt cutter, use it on the chain-padlock.
If you do not have the bolt cutter, look at the plaque bottom of right wall and see that the school was built in 1967. Enter 1967 on the padlock.

Boiler gauges:
Check the chart on the left wall and see where the gauges should be set.
Look down and open the toolbox left by the Dillon HVAC (as noted in the security report). Take the gloves.
Use the gloves on the 3 levers above the gauges. Adjust the gauges to the correct settings.
The middle gauge is at the correct setting already. The left and the right gauge need to be adjusted.
Use the gloves on the left lever 2 times.
Use the gloves on the right lever 2 times.
Use the gloves on the left lever 1 time. 

 Look around. See that the panel for the elevator is ripped off. The elevator cannot be opened.


Matches:    Look left and see a Maxine Diner cup and a book of Maxine's matches. Check the matches. See a Mercury symbol on the cover. This must be the match and the "the first step" that Jake referred to on his "Things to Remember" list.

Turn around from the matches and see a grate right of the boiler. Pick up the video cassette in front of the grate.
Exit through the grate.


Aunt Eloise's home:

Go home and enter the living room.
Open the TV cabinet. Turn the TV on and use the video cassette on the video recorder.
Watch Hunk with the Hectinol box in his locker and the masked judo winner place the trophy in the locker. See Hal copying the essay. This is what Jake used to blackmail the other students.
Take the video cassette out of the machine.

Go to diner and talk to Daryl. Daryl leaves in a huff.
Detective Beech:    Go to the booth and talk to Detective Beech about Dillon and something lost. He says it is his wallet. He really wants Jake's journal.
Confront the students:

Go back to the school. Hal already admitted his cheating.
Talk to Connie at the student union about the judo win.
Talk to Hulk by the gym about the drug station robbery. He saw Daryl Gray delivered a note to Jake.

Jake's Things to Remember continued:
Go back to the school and finish Jake's list. Go to the library and Jake's chair.
18 steps:     There are 18 letters and numbers on the 18 clues left on notes all over the place. All those notes have been collected.
Elements:    Look at the Periodic Table of the Elements on the wall above Jake's chair.
Arrange the 18 clues:
Based on the letters and digits seen in the notes, the letters on the left side of the note clues are elements. Find those letters on the periodic table.
The right sets of letters with digits are the directions.
Arrange them by the atomic numbers shown at top left of each square.

He U2 As U4 I U2

C R1 Kr L2 Xe R3
Na L3 Y D3 La U2
Cl D2 Zr R4 Hf L1
K R1 Ag D1 Ir D2
Zn D1 Te L3 Hg L3


Open the box:
Look under the chair and take out Jake's box.
See the cover of the box has buttons with symbols on them.
The match clue states that mercury symbol is the "first step".
Starting from mercury, follow the directions seen on the 18 steps.
U means up; R is go right, L is go left and D is go down.
The digits are the number of the buttons to move down to.
Start at the mercury symbol shown on the match, them Up 2; Right 1; Left 3; Down 2; R1; D1; U4; L2; D3; R4; D1; L3; U2; R3; U2; L1; D2; L3.

Take the video cassette with red line.


__________________________________________________________________________________________

part 3_Things to Remember<<<-----                                     ----->>>part 5 Final

Nancy Drew | Secrets Can Kill (Remastered) | part 3_Things to Remember

Teacher's Lounge:

Security report:    Go to the printer at left and take the security report on top.
Learn that: Connie lost her backpack. Dillon HVAC Service left a toolbox at the boiler room. Hal retrieved his homework that night. Hulk and possibly Jake were arguing by the gym. Daryl Gray and other kids were caught soaping the teacher's lounge windows. At midnight, Jake was found by east stairwell.

Bulletin board:    See that the bulletin board left of the door has CL D2 on it.
Exit the teacher's lounge.

Bookcase:    Look close at bookcase right of the door.
Read about Gray Enterprises' second quarter's loss and possible leak of classified military hardware information.

Map:
Check the map on the wall.
See words on the frame of the map.
A Trophy Was Not The Only Prize But Also Money of A Greater Size. Ag D1

File cabinets:    Look close at file cabinets. Open the Senior Final Papers drawer.
Pull out Tanaka, Hal's folder. Nancy comments that it is exactly like the one in Jake's locker.
This must be the one referred to by the note at right front hallway board and the right note on the board by Gaiser Gym.

Exit the teacher's lounge.
Mitch Dillon:
Get a threatening phone call from Mitch Dillon.
Use the cell phone. Click menu and select phone. Press call button under Mitch Dillon's name.
Talk to Mitch Dillon. He denies threatening Nancy.

Library:
Let's finally go to the library. Turn right from the lounge and enter the study dome. Turn left to the back hallway.
Use Aunt Eloise's key taken from the safe door on the library lock.
If you read every available active book in the library, you might get an award.

Magazines
Go right pass the Information Desk. Turn right behind the Information Desk and check the magazines.
Read the Sports Today magazine. Learn about Hectinol, a human growth hormone. Nancy comments about it being stolen from the Drug Station.
This must be what is referred by the clue on the front left side hallway board.


Reference books:
Turn around from the magazines and check the reference books on the nearest bookcase.
Kanji:    Pull out the K red-white Encyclopedia Americana from top left shelf.
Learn that the medallion Connie is wearing is Kanji for crane. Remember the Judo poster by the soda machine and the middle clue on the board outside the gym.
Take the coin above the R Encyclopedia Americana.
Braille:    Pull out the B of the Global Book at top right shelf.
Remember that the maintenance door has a Braille keypad and that the password learned from Aunt Eloise's computer is NOTE.

Maps: Turn right from the reference bookcase. Look close at the cabinet at the corner.
Remember the clue on the student union's board.
Open the fifth drawer from top. Pull out the paper behind the map.


Red letters:    If anything happens to me sear
Blue letters:    ch under my combo in catalog
Na: L3


Computers:    Go to the computers at back side of the room and right of stairs.
Catalog search:    Let's follow Jake's map clue. Click on a monitor.
Enter the combination to his locker on the catalog search line: 5253. Click on Go.
See Evidence by J. Rogers - Under My Seat - Reference.
Let's look for Jake's seat.


Jake's chair:    Go forward and see a table with a yellow pad with "Jake was here".
Chemistry book:    Remember the eye chart clue. It states page 305 of the chemistry book.
Open the book and read Jake's Things to Remember:
* The answer to my fate lies in the box.
* A matchbook behind Maxine's schedule holds the first step.
* My messages hold the remaining 18 steps.
* The Elements tell the order.
* The letter and digit tell the direction.
I:U2
Jake's Things to Remember:
Box:    Check "under my seat" clue by looking under the chair at right.
See a box with symbols. We can come back to this later.

Hulk Sanchez:
Go outside the gym and talk to Hulk (if you haven't yet) about his injury.
Hal Tanaka:
Talk to Hal at the study dome about his essay.

Connie Watson:
Turn around from Hal and go to the student union down the hallway. Talk to Connie about her medallion and money.

Daryl Gray:
Exit the school and go to the diner. Talk to Daryl.
Learn that the detective lost something at the diner and accused them of stealing it.
He has an internship at his father's company's computer department.


_____________________________________________________________________________________________

part 2_Teacher's Lounge<<<-----                                           ----->>>part 4_Jake's box

Nancy Drew | Secrets Can Kill (Remastered)| part 2_Teacher's Lounge

Bulletin boards continued:
Outside the library:    Turn back to hallway and go left at the back hallway.
Go forward to the display outside the Memorial Library.
Check the student art exhibit boards. Take a coin from the woman in silhouette's magnifying lens.

Left library board:    Look close at the bulletin board left of the library door.
The note at left side of the board is written from right to left in reverse.
Grape grape
orange cool
will play the alarm
in the school
Zr: R4


Right library board:    Look close at the bulletin board right of the library door.

The note at right side of the board is written in numbers.
Count off the letters in the alphabet to decipher this note.
cool, cool
pop, spot
grape 
Y: D3


Hal Tanaka:
Go forward to the Study Dome at end of right hallway. Talk to Hal. He wants to be a doctor.
Bulletin boards continued:
Study Dome board:    Look close at the bulletin board at left end of the windows.
Check the Paseo HS news left of the Earth Day poster.


The note is written in reverse and right to left.
The hidden video tape will seal my murderers fate.
C: R1

Pick up the coin on the floor left of the trash bin.
Turn around from the board. Take a coin 2 tables right of Hal.
Take coin from top of the recyclable cans bin.
Pan right and take the coin top of the fire extinguisher at right.


Back right hallway:
Enter the hallway right of the recyclable cans bin.
Check the bulletin board at left. Look close at the blue and white note under the Get Involved sign at right side.

The words are separated at the center by clear line.
A crane contestant in a masked disguise, won the prize money despite the lies.
AS: U4


Front right hallway:    Go forward and take coin from the left drinking water fountain.
Look close at the board right of the entrance of the student's lounge.
Look close at the Senior Essay Contest note.

Certain letters are underlined. Combine them to form words and then sentences.
put elements in order to open puzzle Zn: D1


Student's Union board:    Turn around. Enter the lounge between the 2 bulletin boards here at the right hallway.
Look close at the bulletin board at right. Look close at the pink note partly covered by the Victory sign at bottom left.

Read the words formed by the first letters of each line.
Fifth map drawer La: U2

Connie Watson:
Talk to Connie, the school monitor. Talk to her several times until Nancy stops the conversation.
Learn about Daryl, Hal and Hulk.
Teacher's lounge:
Try to enter the Teacher's lounge door left of the bulletin board and Connie stops you.

Hal Tanaka:
Go back to Hal at the student's dome. Talk to him again about everyone.
Learn about Hulk's injury and the bankruptcy of Daryl's father.

Hulk Sanchez:
Go back to Gaiser Gym at other side of the building. Talk to Hulk about the other students.

Soda machine:    Look close at the soda machine.
Remember the clue noted on the right bulletin board outside the library.
Do not add any coins or click on the coin slot of the machine.
Press cool, cool, pop, spot, grape.
Take a confidential Easter egg. Also get 80 coins added to your stash.

Get Connie the monitor out of the student's union:
There's a soda machine here. It is time to distract Connie away from the lounge.
Remember the clue on the left board outside the library.
Do not add any coins or click on the coin slot of the machine.
Press: Grape grape orange cool
Hear the alarm go off. Hulk says to call Connie.
Go to the student union: go to hallway, left at next hallway, right and enter the student union.
Talk to Connie about other things and the alarm.

Connie Watson:
Connie leaves to fix the alarm.
Read her notebook. Learn about her feelings for someone.

Teacher's Lounge:
Use the teacher's lounge key taken from Aunt Eloise's secret book on the locked door.
Enter and look around.

Computer:    Turn right and click on the computer monitor or keyboard or mouse.
Using your keyboard enter user name: Eloise Drew and password: O Wise Elder.
Press Ok.
Check the printer. Click Ok to print the security report.
Check mail and learn that Jake has bulletin board duty.
Check password and learn that maintenance room's password is NOTE.
Check the To Do list and learn that Dillon HVAC is needed for boiler service.


__________________________________________________________________________________________

part 1_Combination lock<<<-----                           ----->>>part 3_Things to Remember